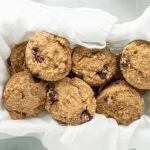
Quick Summary: This brookie caramel slice combines three amazing layers: a chewy chocolate chip cookie base, rich salted caramel filling, and fudgy brownie top. Perfect for parties, potlucks, or when you can’t choose between cookies and brownies!
Introduction
Have you ever stood in your kitchen wondering if you should make brownies or cookies? Well, I have good news – you don’t have to choose anymore! This brookie caramel slice recipe brings together the best of both worlds, plus an amazing caramel layer that makes these bars totally irresistible.
Related Recipe: Easy Oatmeal Cookies Recipe with Few Ingredients
I first made these for a family gathering when my sister wanted brownies and my niece begged for chocolate chip cookies. Instead of making two separate batches, I decided to layer them together with a gooey caramel filling in between. The result? Everyone loved them, and I’ve been making this brookie caramel slice recipe ever since.
These dessert bars are easier than you might think. You don’t need any fancy equipment or hard-to-find ingredients. Just three simple layers that come together beautifully: a buttery cookie base loaded with chocolate chips, a smooth homemade caramel made with condensed milk, and a rich brownie layer on top. Trust me, once you try these, regular brownies or plain cookies just won’t hit the same!
Related Recipe: Garlic Bread Recipe from Scratch
What Makes This Brookie Caramel Slice Special
The Perfect Layered Dessert Bar
What makes this recipe stand out is how each layer works together. The cookie dough on the bottom stays nice and chewy, giving you that classic chocolate chip cookie taste. The caramel filling in the middle adds sweetness and a smooth, gooey texture that brings everything together. And the brownie layer on top? It’s fudgy, rich, and chocolatey – exactly what brownie lovers want.
Unlike regular brookies that just stack cookies and brownies together, the caramel layer in this recipe creates something really special. It keeps the layers from being too dry and adds an extra flavor that makes people ask, “What’s in these? They’re amazing!”
Why This Recipe Works Every Time
I’ve tested this recipe many times to make sure it’s foolproof. Here’s what makes it work so well:
- Simple ingredients – You probably have most of them in your kitchen already
- Clear steps – Each layer is easy to make, even for beginners
- Great texture – The cookie base stays chewy, the caramel is gooey, and the brownie top is fudgy
- Make-ahead friendly – You can prepare these the day before, and they taste even better
- Crowd-pleaser – Kids and adults both love these bars
Related Recipe: Easy Homemade Whole Wheat Bread Recipe
Understanding Your Ingredients
Key Ingredients for Each Layer
For the Cookie Base: The bottom layer uses basic cookie ingredients like melted butter, brown sugar, flour, and lots of chocolate chips. Using melted butter (instead of softened) helps create a denser, chewier cookie that can support the layers on top. Brown sugar adds moisture and a slight caramel flavor that pairs perfectly with the middle layer.
For the Caramel Layer: The caramel is made with butter, brown sugar, condensed milk, and vanilla. This is a simple stovetop caramel that doesn’t require a candy thermometer. The condensed milk makes it creamy and smooth. Adding a pinch of salt creates that popular salted caramel flavor everyone loves.
For the Brownie Layer: The brownie batter uses melted chocolate and cocoa powder for maximum chocolate flavor. Beating the eggs well before adding them creates those beautiful crackly tops that bakery brownies have. This brownie recipe stays fudgy even after cooling, which is exactly what you want.
Ingredient Substitutions That Work
- All-purpose flour – You can use a 1:1 gluten-free flour blend if needed
- Chocolate chips – Semi-sweet or dark chocolate chips work great. You can even mix in white chocolate chips
- Butter – For dairy-free, use plant-based butter in all three layers
- Condensed milk – Coconut condensed milk works for dairy-free caramel
- Cocoa powder – Dutch-process or natural cocoa both work fine
Related Recipe: Honey Wheat Bread Recipe
Pro Tips for Perfect Brookie Caramel Slices
Getting Each Layer Just Right
Cookie Layer Tips: Don’t overbake the cookie base! It will continue baking when you add the other layers, so you want it just set when you take it out the first time. The edges should look done, but the center can still look a little soft.
Caramel Layer Tips: The secret to smooth caramel is constant stirring. Use a whisk and keep moving it around the pan. Don’t let it boil too hard – a gentle simmer is perfect. If you see the caramel starting to separate or get grainy, take it off the heat and whisk really fast until it comes back together.
Let the caramel cool for about 10 minutes before pouring it on the cookie layer. If it’s too hot, it might melt the cookie underneath. If it’s too cool, it won’t spread easily.
Brownie Layer Tips: Don’t overmix the brownie batter once you add the flour. Stir just until you don’t see any white streaks. Overmixing can make the brownies tough instead of fudgy. Also, drop spoonfuls of brownie batter all over the caramel first, then gently spread it. This helps prevent the caramel from mixing into the brownie.
Baking and Cooling for Best Results
The hardest part of this recipe is waiting! These bars need time to cool completely before cutting. I know it’s tempting to dig in right away, but warm caramel is too soft to cut cleanly. Put the pan in the fridge for at least 2 hours, or even overnight. Cold bars slice beautifully and have the perfect texture.
When you’re ready to cut, use a sharp knife and wipe it clean between cuts. This gives you those perfect, Instagram-worthy squares. For even easier cutting, lift the whole thing out of the pan using the parchment paper, then slice on a cutting board.
Related Recipe: Best Whole Wheat Bread Machine Recipe
Recipe Card
Easy Brookie Caramel Slice Recipe
Description: Three-layer dessert bars with a chocolate chip cookie base, homemade salted caramel, and a fudgy brownie top.
Prep Time: 30 minutes
Cook Time: 45 minutes
Cooling Time: 2 hours
Total Time: 3 hours 15 minutes
Servings: 16 bars
Ingredients
Cookie Layer:
- 1/2 cup (115g) unsalted butter, melted
- 3/4 cup (150g) packed light brown sugar
- 1 large egg
- 2 teaspoons vanilla extract
- 1 1/2 cups (190g) all-purpose flour
- 1/2 teaspoon baking soda
- 1/4 teaspoon salt
- 1 cup (175g) semi-sweet chocolate chips
Caramel Layer:
- 1/2 cup (115g) unsalted butter
- 1/2 cup (100g) packed light brown sugar
- 1 can (14 oz/395g) sweetened condensed milk
- 1 teaspoon vanilla extract
- 1/2 teaspoon sea salt
Brownie Layer:
- 4 oz (115g) dark chocolate, chopped
- 1/2 cup (115g) unsalted butter
- 3/4 cup (150g) granulated sugar
- 2 large eggs
- 1 teaspoon vanilla extract
- 1/3 cup (40g) cocoa powder
- 1/2 cup (65g) all-purpose flour
- 1/4 teaspoon salt
Instructions
Prepare the Pan:
- Preheat your oven to 350°F (175°C).
- Line a 9×9-inch square baking pan with parchment paper, leaving some hanging over the sides for easy removal. Spray lightly with cooking spray.
Make the Cookie Layer: 3. Mix the melted butter and brown sugar in a large bowl until smooth. 4. Add the egg and vanilla, then stir until well combined. 5. Add the flour, baking soda, and salt. Stir just until no dry flour remains. 6. Fold in the chocolate chips. 7. Press the cookie dough evenly into the bottom of your prepared pan. 8. Bake for 15 minutes until the edges look set but the center is still slightly soft. 9. Remove from oven and let cool while you make the caramel.
Make the Caramel Layer: 10. Put the butter and brown sugar in a medium saucepan over medium heat. 11. Stir until the butter melts and the mixture starts to bubble gently. 12. Pour in the condensed milk and add the vanilla and salt. 13. Whisk constantly for 8-10 minutes until the mixture thickens and turns a deeper golden color. It should coat the back of a spoon. 14. Let the caramel cool for 10 minutes, then pour it over the baked cookie layer. 15. Spread it gently to cover completely. Set aside while you make the brownie layer.
Make the Brownie Layer: 16. Put the chopped chocolate and butter in a microwave-safe bowl. Heat in 30-second bursts, stirring between each, until smooth. 17. Whisk the sugar, eggs, and vanilla together in another bowl until light and fluffy (about 2 minutes). 18. Pour the melted chocolate mixture into the egg mixture and stir until smooth. 19. Add the cocoa powder, flour, and salt. Stir just until combined – don’t overmix! 20. Drop spoonfuls of brownie batter all over the caramel layer. 21. Gently spread the batter to cover the caramel completely.
Bake and Cool: 22. Bake for 25-30 minutes until the brownie layer is set and a toothpick inserted in the center comes out with just a few moist crumbs. 23. Let the pan cool on a wire rack for 30 minutes. 24. Put the pan in the refrigerator for at least 2 hours (or overnight) before cutting. 25. Lift the whole slab out using the parchment paper, then cut it into 16 squares.
Notes & Tips
Storage: Keep these bars in an airtight container in the fridge for up to 5 days. They actually taste even better on day two!
Freezing: These freeze beautifully! Wrap individual bars in plastic wrap, then put them in a freezer bag. Freeze for up to 3 months. Thaw in the fridge overnight or at room temperature for an hour.
Pan Size: You can use a 9×13-inch pan instead – the bars will be thinner. Reduce the baking time by about 5 minutes for each layer.
Serving Tip: For the cleanest cuts, let the bars sit at room temperature for about 10 minutes before slicing. The caramel will be easier to cut through.
Make It Yours: Try adding a handful of chopped pecans or walnuts to the cookie layer, or sprinkle some sea salt flakes on top of the brownie layer before baking.
Nutrition Information (per bar)
- Calories: 385
- Total Fat: 20g
- Saturated Fat: 12g
- Cholesterol: 75mg
- Sodium: 180mg
- Total Carbohydrates: 48g
- Fiber: 2g
- Sugar: 36g
- Protein: 5g
Note: Nutrition information is estimated and may vary based on ingredients used.
Final Thoughts
Making this brookie caramel slice recipe might seem like a lot of steps, but trust me – it’s worth every minute. Each layer is simple on its own, and when you put them all together, you get something really special. Whether you’re baking for a party, bringing treats to work, or just want to try something new, these bars are always a hit.
The best part? Once you make these a few times, you’ll get faster and more confident with each layer. You might even start adding your own twists, like different types of chocolate chips or a sprinkle of sea salt on top.
I’d love to hear how your brookie caramel slices turn out! Did you make any changes to the recipe? Do you have questions? Feel free to leave a comment below. Happy baking!
Frequently Asked Questions
Can I make these brookie caramel slices ahead of time?
Yes! These bars are actually perfect for making ahead. You can bake them up to 2 days before you need them. Once they’re completely cool and cut, store them in an airtight container in the fridge. The flavors get even better after sitting overnight as everything settles together. Just let them sit at room temperature for about 15 minutes before serving so they’re not too cold.
Why is my caramel layer too hard or too soft?
If your caramel is too hard, you cooked it a bit too long. Next time, take it off the heat when it’s thick but still flows slowly from your spoon. If it’s too soft and won’t set, you didn’t cook it long enough. The caramel needs to reach about 220°F (if you have a thermometer), or it should coat the back of a spoon and hold a line when you run your finger through it.
Can I use a boxed brownie mix to make this easier?
Absolutely! Using a boxed brownie mix is a great shortcut. Prepare it according to the package directions, then spread it over the caramel layer. This cuts down on prep time and still gives you delicious results. Many readers do this when they’re in a hurry, and it works great.
How do I keep the layers from mixing?
The key is temperature and patience! Let each layer cool slightly before adding the next one. The cookie layer should cool for at least 10 minutes, and the caramel should cool for 10 minutes too before you add the brownie batter. When adding the brownie batter, drop it in spoonfuls all over instead of pouring it in one spot. Then spread it gently without pressing too hard.
Can I freeze brookie caramel slices?
Yes, these freeze wonderfully! Cut them into bars first, then wrap each one individually in plastic wrap. Put all the wrapped bars in a freezer-safe container or bag. They’ll stay good in the freezer for up to 3 months. When you want one, just take it out and let it thaw at room temperature for about an hour, or thaw in the fridge overnight.
Related Recipes:
 Korean Retinol Tea Recipe: The Complete Guide to This Viral Anti-Aging Beauty Drink
 Korean Retinol Tea: Everything You Need to Know About This K-Beauty Wellness Trend
 Easy Homemade Whole Wheat Bread Recipe – Soft & Yummy Made at Home
 Easy Honey Wheat Bread Recipe: The Best Homemade Bread for Kids
 The BEST Whole Wheat Bread Machine Recipe (Super Easy!)
 How to Make Yummy Whole Wheat Sourdough Bread (It’s Easier Than You Think!)
 Soft and Yummy Whole Wheat Sandwich Bread Recipe (Must Try!)
 Korean Retinol Tea Loophole: The Viral TikTok Secret to Glowing Skin Without Harsh Retinol
 The Simplest Rustic Whole Wheat Bread Recipe You’ll Ever Make
 Easy Authentic Rougamo Bread Recipe: The Crispy Chinese Flatbread 2025 Recipe
 Bread Flour vs All-Purpose Flour: What’s the Difference?
 King Arthur Gluten-Free Sourdough Bread Recipe
 Easy Homemade Ezekiel Bread Recipe: Sprouted & Nutritious
 Easy Homemade Garlic Bread from Scratch with All-Purpose Flour
 Best Garlic Bread Recipe from Scratch: Step by Step Guide
 Leavened vs Unleavened Bread: Complete Guide | Differences & Example
 Logan’s Viral Cucumber Salad Recipe – Easy 5-Minute Asian Cucumber Dish
 Himalayan Salt Diet Recipe: Does It Really Work?
 Ultimate Double Chocolate Sourdough Bread Recipe
 Double Chocolate Espresso Sourdough Bread Recipe: Step by Step Guide
 Bariatric Gelatin Recipe: A Protein-Packed Snack for Weight Loss & Satiety
 Bariatric Gelatin Recipe for Weight Loss: The Classic Gelatin Trick That Actually Works
 Barefoot Contessa Turkey Chili Recipe (Ina Garten’s Hearty Chili)
 Step by Step 7 Brew Banana Bread Blondie Recipe
 3-Ingredient Gelatin Recipe for Weight Loss (No Sugar)
 Chipotle Red Chimichurri Sauce Recipe: Bring the New Sauce Home
 Marry Me Potato Casserole Recipe (Easy & Irresistibly Cheesy)
 Coffee Loophole Recipe: The Viral TikTok Trend for Weight Management
 Easy Oatmeal Cookies Recipe with Few Ingredients